Corne Keyboard – The Perfect Keyboard for Gamers and Typists!

Hey everyone! I recently picked up a Corne Split Keyboard and I’m loving it so far. For those unfamiliar, the Corne is a mechanical keyboard designed by Foostan. It’s meant to be more ergonomic and comfortable to use than traditional rectangular keyboards.

One of the things that really sets this keyboard apart is its customizable RGB LED lights. You can choose from a wide range of colors and patterns to suit your style. I’ve been having a lot of fun playing around with different lighting setups.

In terms of the actual typing experience, I decided to go with “lubed” Holy Panda key switches. These linear switches are known for their smooth and responsive feel, and they definitely don’t disappoint. I’ve been using the Corne for both typing and gaming, and the Holy Pandas have been great for both.

The Corne Split Keyboard has gained a lot of popularity among mechanical keyboard enthusiasts due to its unique design and customizable features. If you’re interested in learning more about the Corne, there are several resources available online that can provide additional information and reviews.

One great place to start is the official Corne Keyboard repository on GitHub, which includes detailed documentation on the keyboard’s design and features. You can also check out the r/Corne subreddit, where users share their experiences and tips on using the keyboard.

Additionally, there are several online stores that sell the Corne Keyboard and its components, such as KeyHive.com and MechanicalKeyboards.com. These stores often have a wide selection of key switches and other customization options available for the Corne.

Flashing your Corne Keyboard Using QMK

To flash custom firmware onto the Corne using QMK, you will need to have a few tools and components ready. These include a USB-to-serial adapter, a soldering iron, and a computer with the QMK toolkit installed.

Once you have everything set up, you can follow the instructions on the QMK website to compile and flash your custom firmware onto the keyboard. Flashing custom firmware can be a bit technical and time-consuming, but it’s a great way to fully customize your Corne Split Keyboard and make it truly your own.

Anonabox | Stay Anonymous On The Internet

I am sure most of you have heard about the importance of remaining anonymous and keeping yourself protected while browsing from public Wi-Fi. Then you ask, well how am I supposed to do that?

Well today I want to talk a little bit about a device called “Anonabox” which is a tiny TOR embedded router that can help keep your anonymity safe while browsing the web. Its powered by 5v, supplied by a USB port found on almost every laptop & desktop or by most cell phone chargers via micro usb.


The Anonabox Pro Sitting atop a Macbook Pro


Once powered up you can connect to a wireless access point for internet or if you’d like to “hardwire” in you can do that as well with the supplied LAN/WAN connections. There are 4 models to choose from, the two most popular are The Original & The Pro versions of the Anonabox. Both offering different features for those who just need to use TOR or those who need a more advanced version like the PRO can access features like VPN, or .Onion Web Hosting. In the coming weeks there will be some updates published that allow for more services to be added.


The Anonabox Original and the Pro Versions


The two most popular Anonabox models, The “Original” is for those who needs are basic, a Plug n Play Design. While the “Pro” offers a more advanced user experience, offering more features like VPN access, Ad Blocking, .Onion Hosting & more!


Intel Nuc – How to Install Memory and mSata SSD

Intel NUC RAM & Samsung 850 mSata SSD Installation

In this video you will see a basic installation of Corsair RAM plus a Samsung 850 mSata SSD

Tools You Will Need

  • Phillips Screwdriver
  • Flat Head Screwdriver
  • 10-15 minutes of time

Impressions on the NUC from Intel

So far I have been really impressed with the performance from my NUC. I setup one as a headless server and I couldn’t be any happier. The whole unit can fit in the palm of your hand and depending on which model you get can pack a serious punch. I opted to go with the Intel Celeron 847 Dual Core, I’ll explain further down why I went with this particular model.

In my experience the NUC runs quite cool, I used a R/C Engine thermometer to test the temperature and it came in at a cool temp of 88°F so I measured my smartphone with the same thermal temperature sensor just to compare and my phone measured 85°F.

I have been looking for a solution to my server needs and this Intel NUC was up to the task. I needed something that was small and compact so at first I tried using a Raspberry Pi which is a great computer but just didn’t have the horsepower I needed and most of all a gigabit NIC. So after quite a few open source computer purchases with the latest being a bananaPi by LeMaker, I just couldn’t find a suitable piece of equipment that would fit my requirements.

The Banana Pi is another fantastic piece of hardware, it even sports a full size SATA port, which is great considering I was using it for a server. However the SATA speeds were not as I had hoped. The average transfer speed over a gigabit network was around 40 MB/s which is about average for most NFS systems. I personally prefer faster speeds, like around 110 MB/s which is exactly what I can expect from the NUC.

Reasons Why I Purchased the NUC
  1. Low Power Consumption (17 Watts) !!
  2. Runs Extremely Cool
  3. Completely Silent Operation
  4. Small Footprint
  5. VESA Mountable
  6. Very Affordable
  7. Gigabit Ethernet
Specs
  1. Intel Celeron Dual Core 847
  2. Max 16GB RAM
  3. Dual HDMI Ports
  4. 7.1 Surround through HDMI
  5. 5 Total USB Connections (3 external & 2 via internal header
  6. 3 Year Limited Warranty

Quadcopter Mini 250mm | Flashforge Creator Pro

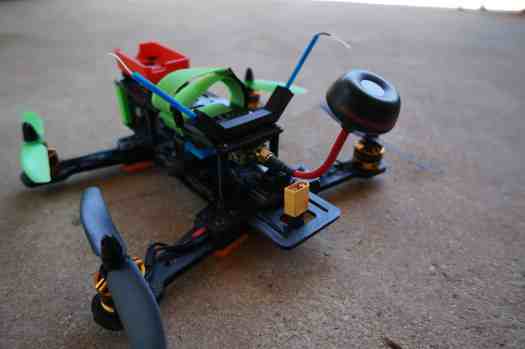
Cyantechio 3D Printed Multirotor 250mm

3D FPV Quadcopters

I have yet to actually fly FPV… I don’t trust myself with my eyes off the aircraft flying at over 45mph!

The Hardware

Flight Controller

Almost all of my 250mm Quadcopter builds use a Naze32 Flight controller which are great boards in my opinion. You can easily update the firmware and make changes using Baseflight or Cleanflight depending on your personal preferences. I personally prefer Cleanflight, it is always getting updates and having things added plus I just like the way my Quads fly when using Cleanflight.

Motors

I am using 2200KV motors made by DYS, I have about 4 sets on different Quads and I think they are pretty good. I’m sure you can get much better motors but these work great and I haven’t had any issues with these motors.

ESC’s

For ESC’s I have decided to go with a set of Hobbypower 12amp Esc’s that have been flashed with Simon K firmware. I am able to get pretty good flights from these esc’s, they don’t get hot and seem to work very well.

The Frame

One of the problems when looking for a Quadcopter frame is finding one that is light, strong and cheap. Which is why I have decided to use 3D printed Quadcopter frames. They are cheap, lightweight, strong and when they break you can just make another one!

Mine is made from PLA which is strong and rigid, comes in many different colors and is much easier to work with that other materials like ABS. A normal frame can be printed in about 8-12 hours depending on the particular settings for that print.

Transmitter

When I comes to R/C Transmitters I prefer Futaba ever since I was little that name has been a common word. Since I have several aircraft like the DJI S900 I needed something with a lot of channels so I decided to go with the Futaba 14sg. It allows you to use up to 14 channels with the correct hardware and settings.

Accessories

So most of you reading this probably know what FPV is, for those of you reading that don’t know what FPV is, let me explain.

FPV

FPV or First Person View allows you to see from the perspective of a pilot sitting in a aircraft. Its like your sitting in the Quadcopter flying, it is quite an experience. In order to fly FPV you need a few things like a mini camera, video transmitter/receiver, batteries to power everything and antennas for your transmitters and receivers.

Most people will have two cameras: one to view FPV and the other to record the flight in HD.
I personally use a Sony CCTV camera with a Fatshark 250mw transmitter.